|
|
|
|
![]()
![]()
![]()
![]()
![]()
![]()
![]()
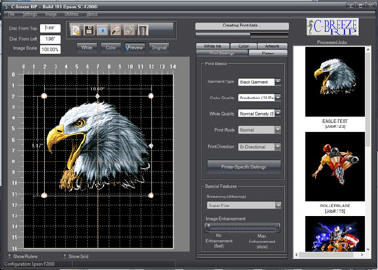
C-Breeze RIP Online Guide
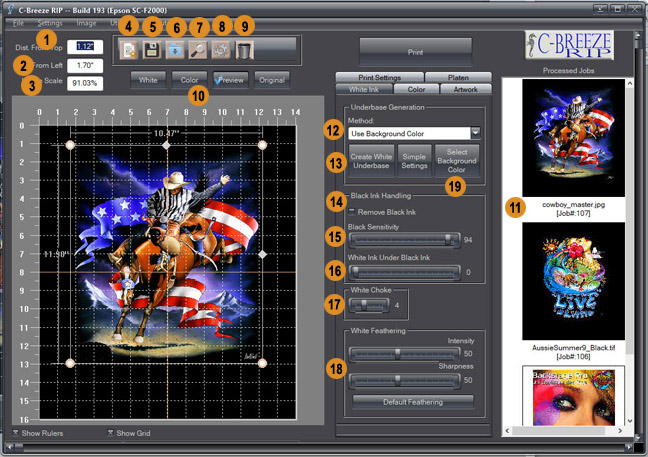
Please note: Unlike Garment Creator, it is NOT necessary that your artwork files be high-resolution. 150 dpi is sufficient for most shirts and it saves processing time.
|
|
|
|
|
|
|
|
|
|
(white layer creation video: Click Here
-
Distance of edge to top of platen
-
Distance of edge to left of platen
-
Size ratio of original file
-
New job
-
Save job
-
Import graphic
-
Zoom view. See below
-
User settings management
-
Delete (artwork from platen or job from printed jobs queue)
-
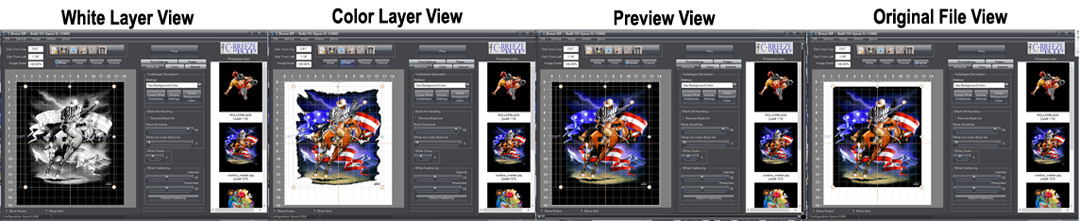
View Select. Selects between the layer views. See below
-
Printed jobs. Double-click to bring back into platen and edit size, position, print settings, white ink, etc.
-
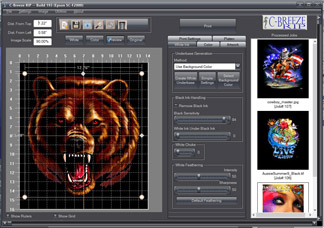
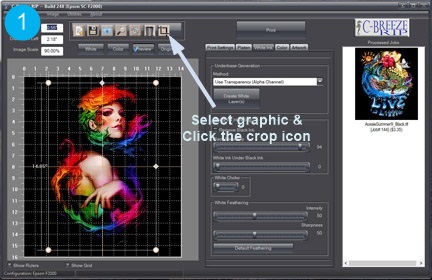
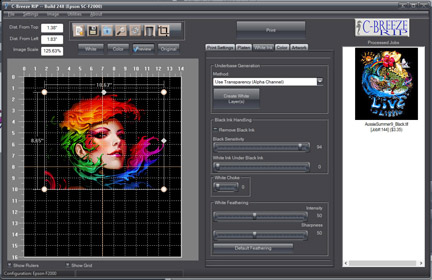
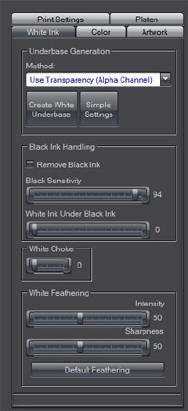
Select white-generation method
-
When clicked, generates the white layer
-
Remove black ink when generating white layer
-
Black sensitivity. The higher the setting, the darker a color must be to be considered black
-
How much white ink to place under black ink (as defined by item 15)
-
Choke amount. How much to erode the edge of the white mask so it won't peek out from under the color
-
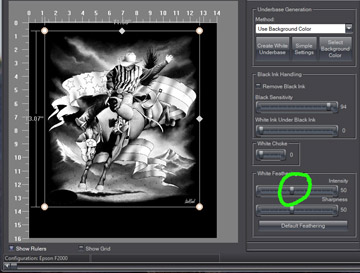
White feathering controls. Intensity changes the overall density of the white mask. Sharpness increases/decreases the softness. See below for examples
-
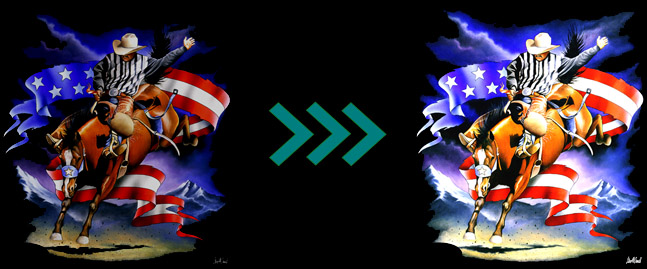
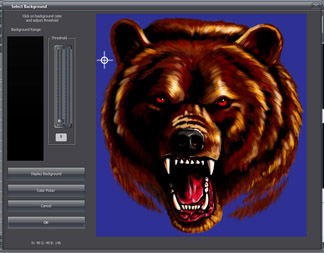
When "Use Background Color" is the slected method, this button invokes background color and tolerance selector dialog. See below.
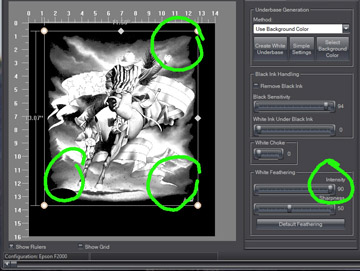
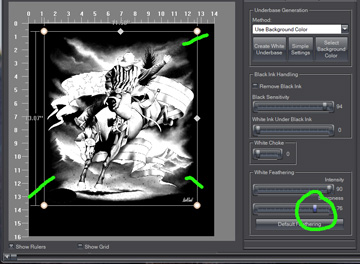
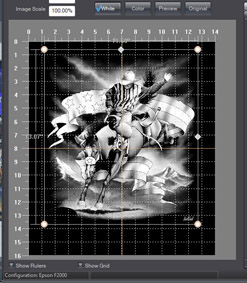
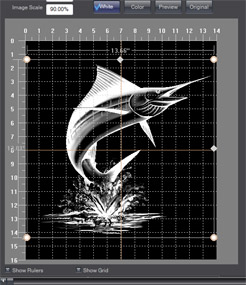
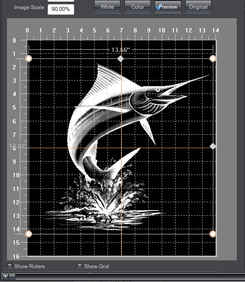
The purpose of these controls is to alter the intensity of the white ink, thus making the print brighter or duller on demand. When the white ink density is increased, it it could also increase the brightness of the shadow areas, which may not be desirable depending on the artwork. The sharpness control allows the user to eliminate the higher white in the shadows, thus eliminating potential "ghosting" around fades in an image. If the image has no fades, or is a white-ink only print, then simply increasing the intensity will more than likely be fine. However, in our example, the image has lots of fades. Using the sharpness control we can "push back" the undesired portion of the white ink after the intensity is increased. We've turned off the guides for better visibility.
 |
 |
 |
|||
|
Normal white layer |
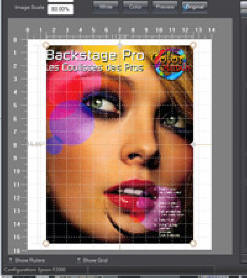
Intensity increased to maximum |
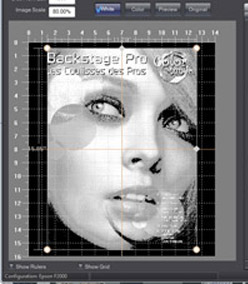
Sharpness used to get rid of ghosting |
|||
| Here is the white layer as it was created by C-Breeze with the default feathering settings (50/50). Most artwork will print great with the default settings (including this artwork). This example is just to illustrate the capability. If, for example, the quality of the shirt being used was yielding very dull prints, we can significantly increase the white ink, thus increasing the brightness of the print, without causing unwanted side effects. | In this (rather exaggerated) example, we'll slide the intensity slider all the way, increasing the white ink to maximum. Although the increase is done proportionately, you can see that the shadows which should contain very little white, are now a bit flooded. This could cause an undesirable "halo" effect. |
By increasing the sharpness, you can see that the undesired white has been proportionately pushed back. The "area" of coverage is now very similar to that of the "normal" white mask (first image in this example) while the overall density of white has dramatically increased, thus making the artwork brighter. As a side note, if further modifications were needed beyond the capabilities of C-Breeze RIP, the white layer can be exported, edited with a bitmap editor (Photoshop, etc.) and brought back in. |
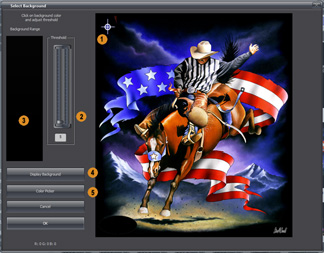
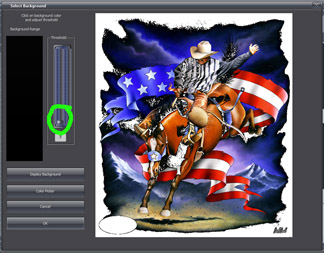
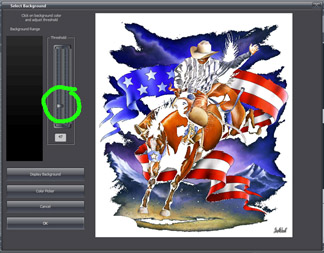
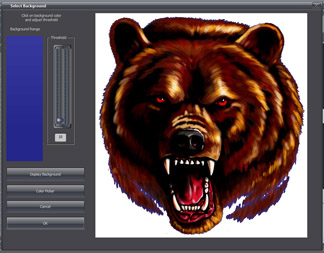
The higher the threshold, the wider the color range that will be considered background and removed
 |
 |
 |
|||
|
Low Threshold |
High Threshold |
||||
| Any solid color can be used used to detect the background. | |||||
 |
 |
 |
|||
When OK is clicked the selection dialog will disappear, the new white layer will be generated and the RIP will switch to Preview View |
|||||
White Generation Video:
|
Use Background Color Method |
||
|
This method uses the background color to figure out what is image and what is not. Any solid color can be used |
||
|
Original artwork |
Resulting White Layer |
Composite Preview |
|
|
|
|
|
Use Transparency (Alpha Channel) Information Method |
||
|
This method uses the alpha channel to figure out what is image and what is not. You can use PSD, PNG and TIF files.Note: Many other RIPs produce an undesirable "halo" around soft edges of images with transparent backgrounds. C-Breeze does not have this problem. |
||
|
Original artwork |
Resulting White Layer |
Composite Preview |
|
|
|
|
|
Underbase Entire Image Method |
||
|
This method works very well for graphics which extend to the borders such as photographs, etc. |
||
|
Original artwork |
Resulting White Layer |
Composite Preview |
|
|
|
|
|
Import white layer from file Method |
||
|
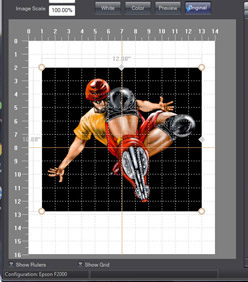
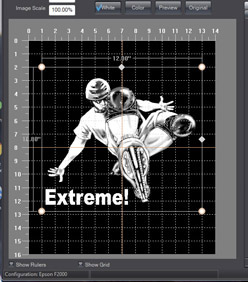
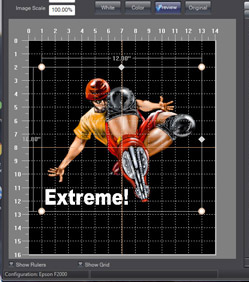
This method allows the user to create their own white layer or to modify the white layer which C-Breeze creates. In this example, we allowed C-Breeze to generate the white layer. We then exported it, added the word "Extreme", then imported it using the Import White Layer method. Please note: The white layer being imported must be an 8-bit-per pixel grayscale image which has the same X and Y dimensions. For example If the original image is 1024 x 1200 pixels, the imported white layer must also be 1024 x 1200. If you use the exported white layer, do not change its dimensions. |
||
|
Original artwork |
Imported White Layer |
Composite Preview |
|
|
|
|
|
Use White Ink Only Method |
||
|
As the name implies, this mode converts the image to grayscale and renders it using only white ink. This method is handy for logos, etc. where only white ink is required. |
||
|
Original artwork |
Resulting White Layer |
Composite Preview |
|
|
|
|

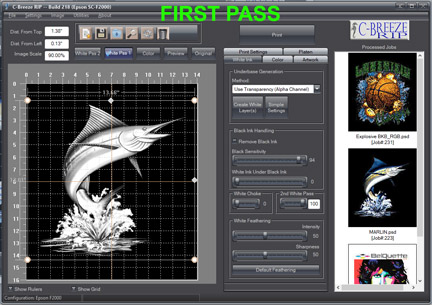
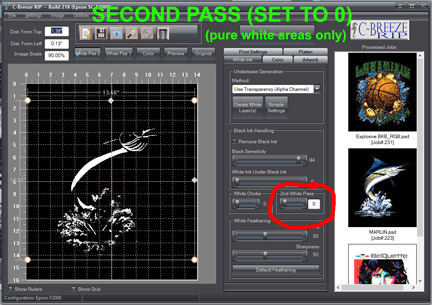
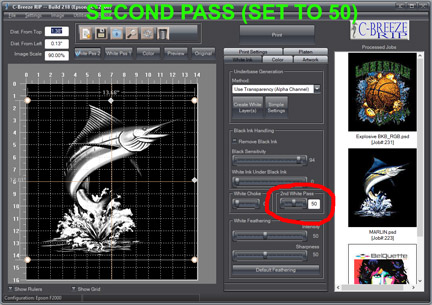
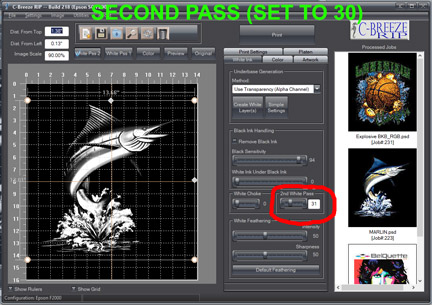
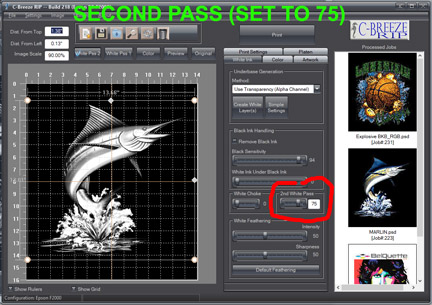
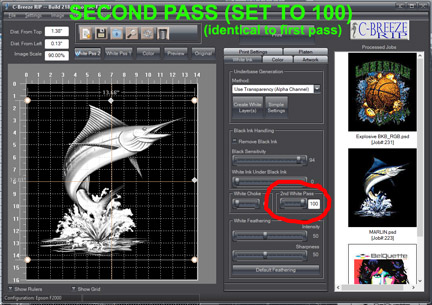
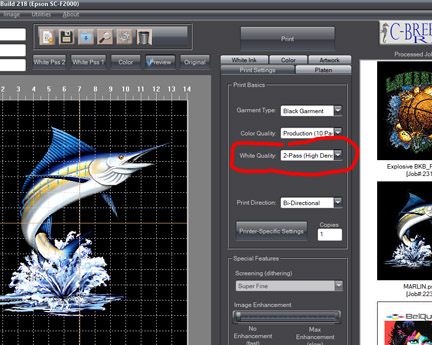 C-Breeze RIP
provides control over the 2nd white pass. When 2-pass white is selected as
the white quality setting, two white layers are printed. This feature allows
users
to control how much white to use during the second pass. This can be used to save ink in cases where it
is
wasteful to print the same amount of ink on the second pass.
C-Breeze RIP
provides control over the 2nd white pass. When 2-pass white is selected as
the white quality setting, two white layers are printed. This feature allows
users
to control how much white to use during the second pass. This can be used to save ink in cases where it
is
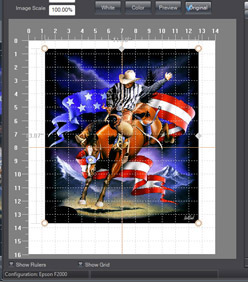
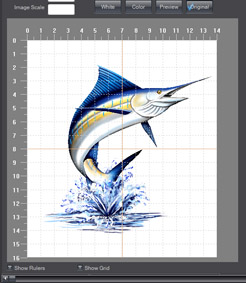
wasteful to print the same amount of ink on the second pass.When the 2nd pass is set to 100, the second pass is identical to the first pass. When the second pass is set to 0, the second pass will include only areas where there is only white ink and no CMYK ink (white highlights). When the user selects the 2-pass white mode, the layer view buttons change to include an additional white view button so that the user can also preview the contents of the second white pass before printing. For this example we will use the same marlin graphic. You can see that when the 2nd pass is set to zero, only the pure white areas of the fish are included in the 2nd pass. Setting it to 100 duplicates the first pass exactly. Settings of 1 through 99 cause the second pass to include more or less of the saturation shades present in the first white pass.The values are gradually feathered in to avoid posterization.
|
||
|
||
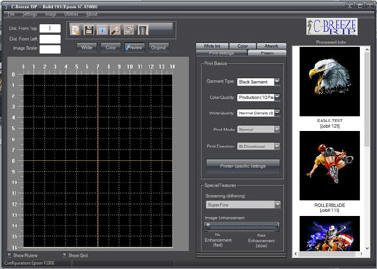
-
Distance of edge to top of platen
-
Distance of edge to left of platen
-
Size ratio of original file
-
New job
-
Save job
-
Import graphic
-
User settings management
-
Delete (artwork from platen or job from printed jobs queue)
-
Layer view select. Selects between the layer views.
-
Initiates the print cycle for current job
-
Canvas / Platen area. Used to position and size the graphic..
-
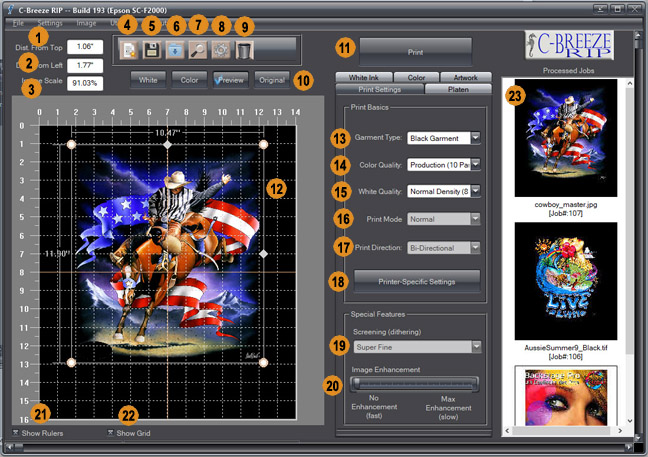
Select the type of garment
-
Select the color (CMYK) quality (resolution)
-
Select white ink quality (resolution)
-
Print Mode. This feature is not available for the F2000 version.
-
Print Direction (Unidirectional or Bi Directional). This feature is not available on the F2000 version. It is permanently set to Bi-Directional
-
Set the printer specific settings. In the case of the F2000, this allows you to set the ink cost per liter and the output resolution
-
Screening type. The F2000 version of C-Breeze only has one type of screening: Superfine
-
Image Enhancement. This allows you to up-sample low resolution images such as small web images or pictures from cheap cell phones, to a better and (usually) usable level.
-
Show/Hide the rulers in the canvas area
-
Show/Hide the grid in the canvas area
-
Processed jobs queue. If you double-click one of the entries, the job will move over to the canvas area and it can be fully edited
-
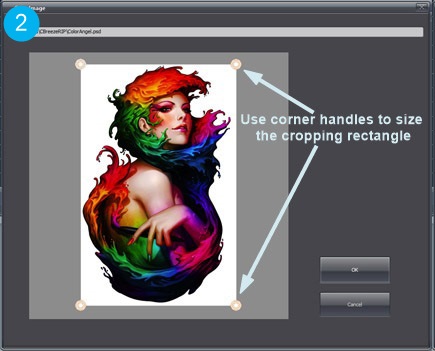
Handles of the selected graphic. To select a graphic click anywhere inside the graphic area. To size the graphic, drag the handles towards and away from the middle. The graphic anchor point is the middle. To move the graphic grab it anywhere in the perimeter that is not a handle. You can also specify its location by entering the number in the upper left of the dialog (Items 1, 2 and 3 in the previous section)
-
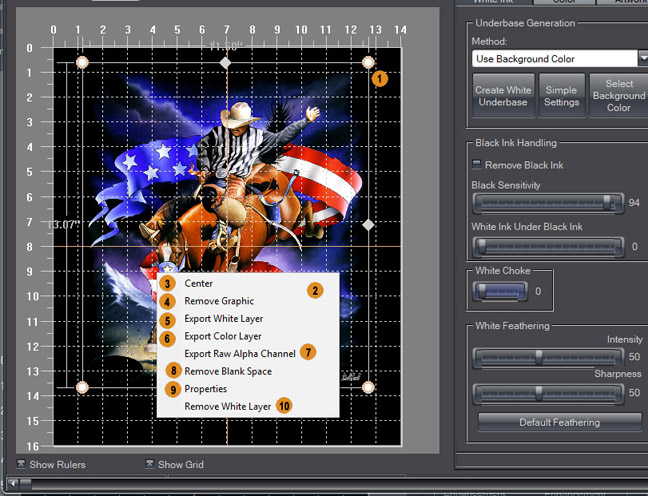
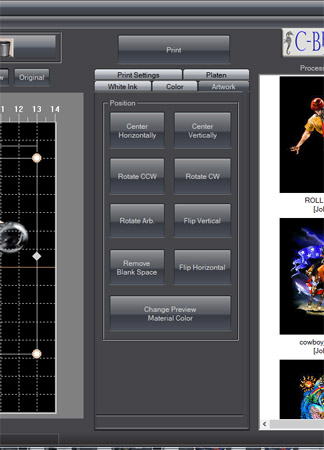
Graphic manipulation pop-up. Right-click inside the graphic area to display it.
-
Center the graphic in the horizontal direction. To center in the vertical direction, you can use the button in the Artwork tab (shown below). Double-clicking inside the image area will also center the graphic
-
Removes graphic from the platen
-
Allows you to export the white layer to a TIF file. You could then edit the white layer and import it back in.
-
Allows you to export the color layer. Depending on the white generation method used, the color layer is altered when the white is created. This feature lets you export the altered color layer
-
Allows exporting the alpha channel. Graphics with transparent channels usually have an alpha layer. Some white-generation methods also create an alpha channel. This lets you export it.
-
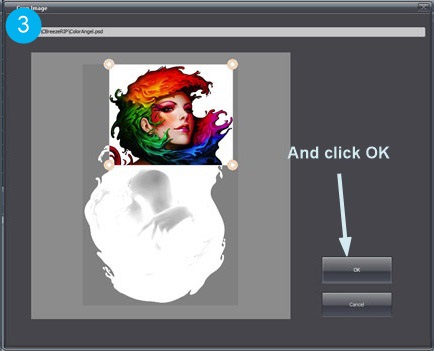
Removes blank space from around an image.
-
Invokes the graphic properties dialog where you can manually change the position, sizing and execute color replacements
-
If for some reason you want to remove the white layer you created, that's how you do it.
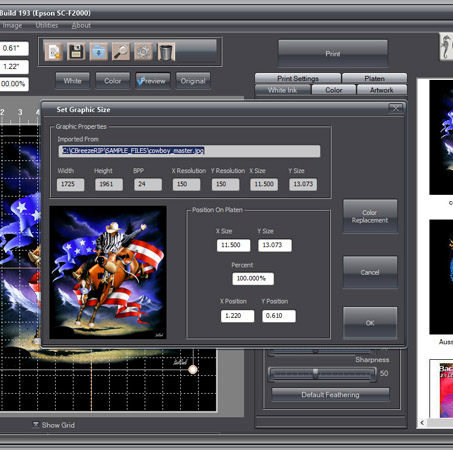
The graphic properties dialog shows the graphic's details and allows the user to specify all the position and sizing parameters in one place. It also allows the launching of the color-replacement dialog.
 |
|
|
|
 |
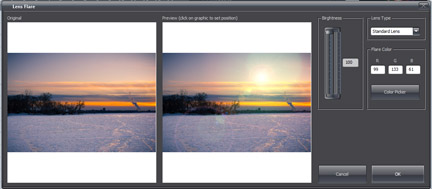
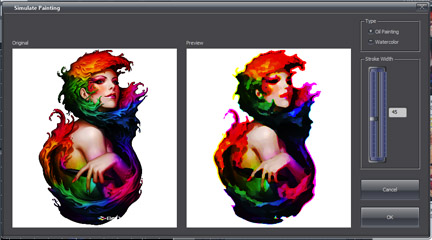
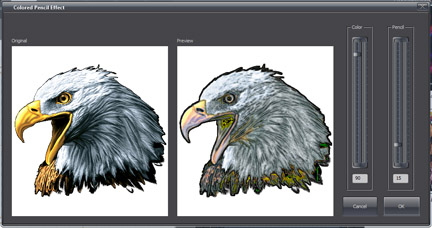
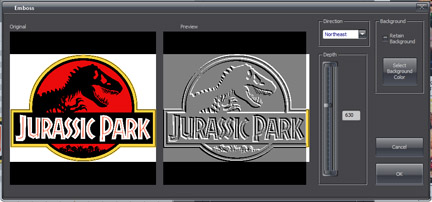
Click here to see a video of the special effects feature
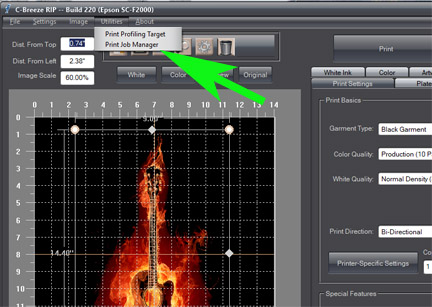
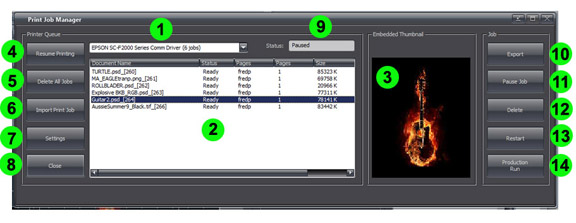
Navigating the Windows operating system to manipulate print jobs can be cumbersome. To make things worse, Microsoft keeps changing that part of the user interface every time a new Windows version is released. It usually requires drilling down several levels before you can access your print jobs. For example, to see the jobs currently being printed to a particular F2000 using the standard Windows interface of Windows 10, you would navigate to: Start / Control Panel / Devices and Printers / Right-click the desired print queue / Click "See What's Printing. The Print Job Manager feature gets you there in 2 clicks (Utilities / Print Job Manager). It instantly takes you to a dialog showing all the jobs for the selected output queue. From there you can manipulate jobs, start production runs etc.
Note: Normally, print jobs disappear after printing and they have to be re-ripped to start a production run. To make them remain after printing (so you can reprint later or print to a different printer), select "Keep Jobs After Printing" in the Setting Section (see #7 below).
You can invoke the Print Job Manager from the utilities drop-down menu item or from the Printer Specific settings which are displayed when you click the Printer Specific Settings button, assuming you're not printing to a folder..
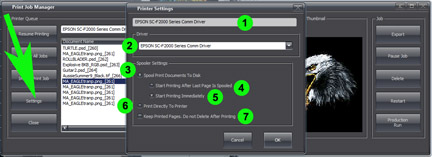
Settings Dialog
The Production Run Feature
The production run feature can be used to request copies of the job be printed on any number of connected F2000 printers. Because the actual job printing is done by the Windows operating system, C-Breeze RIP can be processing additional jobs simultaneously.
Note: To facilitate re-printing jobs, etc., you may want to set "Keep Printed Pages" in the settings dialog (see # 7). Of course, this causes printed jobs to accumulate in the queue. At the end of the day you can simply click "Delete All Jobs" to clear the print queue.
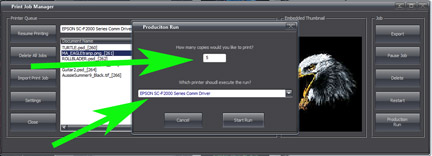
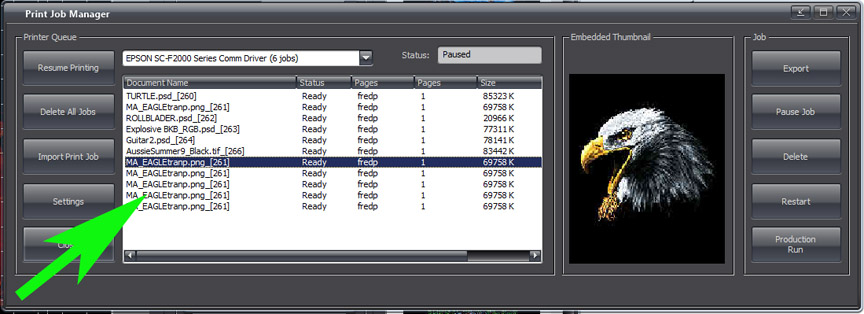
An entry will be created in the print queue for each copy requested. Each of these can be manipulated individually, if necessary.
2. This area shows the jobs currently in the selected print queue and their size and state.
3. If the print job selected contains an embedded thumbnail (as jobs created by C-Breeze RIP do), it will be displayed in this section. It will display the thumbnail (if present) even if created by other RIPs or applications, such as Garment Creator.
4. This button allows you to pause/resume the print queue.
5. The "Delete All Jobs" button provides a quick way to clear a print queue of all jobs.
6. This button allows you to import a PRN file into the selected print queue. The PRN could have been created by any application which supports the F2000, not just C-Breeze RIP. For example, you can import a PRN file exported from Garment Creator and begin a production run without ever re-processing the file (see item #14 for production-run).
7. The settings button allows you to change several settings commonly changed for different production preferences. The settings are named very similarly to the name used in the equivalent area in the Windows control panel. 1 = Name of print queue being edited. 2 = Drop down allowing user to change the queue's driver, 3 = Spools documents to disk instead of sending directly to printer (it is recommended that you leave this selected). 4 = When to start printing. If you select this option, it will spool the entire job before starting to print. This has been know to solve some non-standard issues with the Epson driver. 5 = Starts printing as soon as the job starts to spool. 6 = Prints directly to the printer, bypassing the Windows spooler system. This is not recommended but is included mostly as a means of troubleshooting printer communications problems. 7 = Keep jobs after printing. Normally, jobs disappear after being sent to the printer. If this option is checked, the jobs will remain after printing (their status will change to "Printed"). The user can then re-print them without re-ripping them, start production runs, print them on different F2000 printers, etc..
8. Closes the Print Job Manager window.
9. The current status of the selected print queue.
10. Export allows you to save the selected print file anywhere on the network or any accessible drive, including a thumb drive. This is useful for archiving processed jobs. These can then be imported into any F2000 print queue for printing.
11. Pauses/Resumes the selected job(s)
12. Deletes the selected job(s).
13. Restarts the selected job. If "Keep Printed Pages" was selected in the settings (see #7), the job will stay in the queue after printing. Restarting the job causes it to print again.
14. The production run feature is a quick way to request multiple copies after the file is already processed. Although you can request as many copies as you need from C-Breeze RIP's Processed Jobs list on the main screen, if the job is no longer listed, the user can request multiple copies using the PRN file (if available, obviously) with the production run feature. The production run feature can be used to send jobs to multiple printers. For example, if you had 3 F2000's plugged into the computer, each one will have its own print queue. You can select a job in any of the 3 print queues and send a production run to any other print queue. In fact, you could start a production run to all 3 simultaneously and C-Breeze RIP could be processing pore jobs simultaneously.
Printing multiple copies of a design to multiple F2000 printers:
- In Print Job Manager, select "Keep Jobs After Printing" for one of the F2000 print queues so that it does not disappear. Alternately, you could pause the print queue so that it holds the job without printing it.
- Process the job with C-Breeze RIP.
- Open Print Job Manager.
- Select the job.
- Click the Production Run button
- Enter the number of copies and select the destination printer
- Click "Begin Run"
- Repeat steps 4 - 8 for each printer you wish to print the design on.
- When all desired copies have been printed, you can delete the jobs from the print queue(s) by selecting them and clicking "Delete" or clicking "Delete All Jobs"
Printing multiple copies of a print job that was ripped previously, and is no longer available in C-Breeze RIP's main window or was ripped on a different application:
- For this to be possible, you must have a saved copy of the print job (the PRN file).
- Open C-Breeze RIP
- Click Utilities/Print Job Manager
- Select the print queue for the desired F2000 printer.
- Select "Pause" in the Print Queue section to pause the print queue.
- Click "Import" and navigate to the saved PRN file. The job will be added to the print queue
- Select the job to view the thumbnail to verify it's the correct one.
- You can now click the "Resume Printing" button to print a single copy or start a production run and then click "Resume Printing"
You could also set each hot folder to output to a different destination. This means you could have multiple hot folders with different F2000 printers as their destination, thus allowing C-Breeze RIP to process jobs from multiple sources (hot folders) to multiple printers.
|
1 |
The
first thing we'll do is set up C-Breeze RIP to print exactly the way we
want to print the graphics that are deposited in the folder. So we'll set the garment type and color/white printing mode. Next we will select the white-ink generation method. Most large fulfillment firms use png files with a transparent background as that is a very versatile format which can print on any color garment without worrying about the artwork's background color. So we'll select "Use Transparency" as our black generation method and we'll leave the feathering at the default of 50/50. The rest of the settings are up to the user but the defaults shown should work fine. |
  |
|||
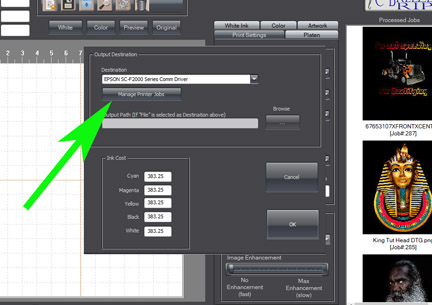
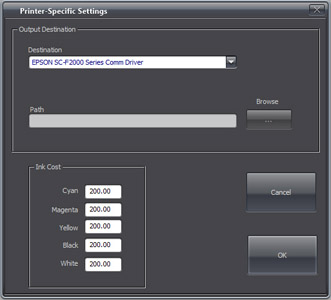
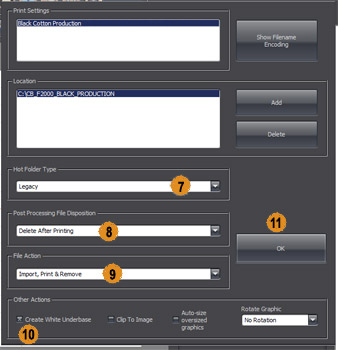
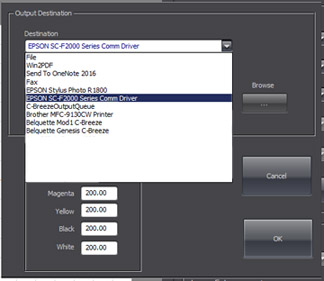
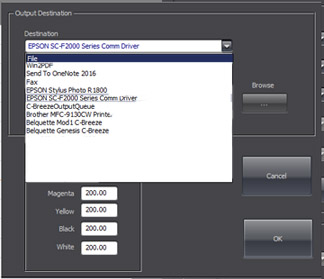
| 2 | Now we
will select where we want the output to go.
In this case we want to print to the F2000 connected to the same computer so we will select the native Epson F2000 communication driver. To do this:
NOTE: The first item in the Destination drop-down is "File". If you select this entry, it will enable the Path field as well as the Browse button. You can then select a destination folder on the host PC or anywhere on the network. |
 |
|||
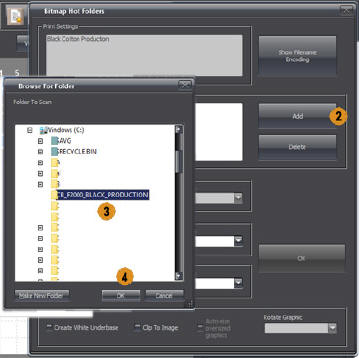
|
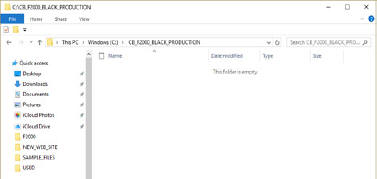
3 |
Next we
will create a folder.
This will be where the properly-named graphic files will be deposited. For our example we will call it CB_F2000_BLACK_PRODUCTION. It's always a good idea to select a name which hints as to what settings will be applied to the graphics deposited therein. |
 |
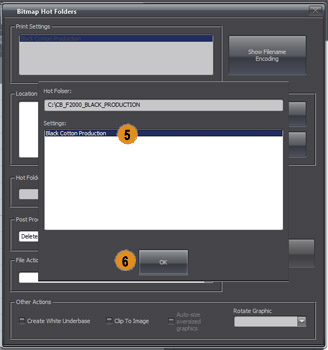
|||
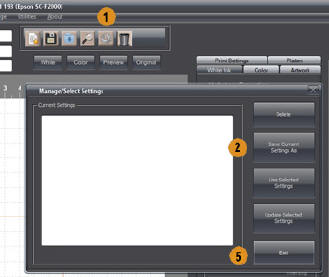
| 4 | Now we
will create a named user-defined setting so we can attach it to the hot
folder.
|
||||
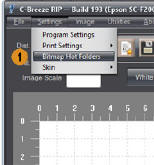
| 5 | Now
we'll create the hot folder scanner entry.
|
|
|||
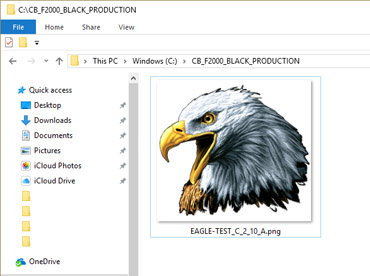
| 6 | Now we
will create a test job to drop in the hot folder
The graphic we've selected is a png with a transparent background. We will be using the Legacy naming convention: This naming convention consists of 5 fields separated with an underscore character "_". Because of this, make sure you don't use that character as part of the job name!!! The name template is: jobname_left_top_width_height.xxx Jobname: Maximum 64 characters, all valid characters allowed EXCEPT the underscore "_" character. Left: This is the number, in inches, of the distance the graphic will be from the left side of the platen. If you enter the letter C instead of a number, it will center the job on the selected platen. If you must use a decimal point, DO NOT use a period ".", instead use a lower-case p. For example, 2.3 inches would be 2p3. Top: This is the distance from the top of the graphic to the top of the platen in inches. Same rules as left as far as decimal number entry. 2.3 inches would be coded as 2p3. Width: The width of the graphic in inches. Same decimal point rule applies as Left and Top. Height: The height of the graphic in inches. Same decimal point rul as Top, Left and Width. For the height, however, you can enter the letter A and it will automatically keep the size of the graphic proportional. If, for some reason, you want to distort the width/height, you can select the height explicitly. XXX: The extension (graphic type) can be: JPG, TIF, PSD, PNG, TGA, BMP, GIF, PIC and a few other less-popular raster formats. So, for our test we will use the Eagle graphic in PNG format with a transparent background. We will name it: EAGLE-TEST_C_2_10_A.PNG This means the job name is "eagle-test", it will be centered on the platen, it will be 2 inches from the top, it will be 10 inches wide and the height will be proportional to the width. Copy the properly named file to the hot folder.
|
||||
| 7 |
C-Breeze RIP automatically opens the graphic sizes
and positions it, creates the white layer, prints it and moves it off
the platen area. Then it's ready for the next job.
|
||||

To print to the native driver, select the
EPSON SC-F2000 Series Comm Driver
To print to a file, anywhere on the network, select "File" from the Destination drop-down and use the Browse button to navigate.
One very handy feature in C-Breeze is the ability to edit the print settings, size and position of a job in the RIP, even if it was printed from an external app.
There is a YouTube video which demonstrates printing from Adobe Illustrator. It shows the Genesis version of C-Breeze but the method is identical except, of course, for the platen size that you select.
In the place where it sets the custom page size, select :
1008 x 1152 which is the 14 x 16 platen. When printing from Corel Draw, check "Use PPD" and navigate to c:\CBreezeRIPF2000\PPD
As is the case with all RIP software, C-Breeze RIP is copy protected. It is a software based copy protection which can be validated using this web site, email or a phone call. The software does not need internet access during normal operation. Each purchase of C-Breeze RIP comes with 3 validations. This does NOT mean you are licensed to run 3 copies of the software. The basic premise is: One for your computer, one for a laptop for remote testing, etc. and one "just in case". For example, if you should have to replace your hard drive or other critical component of your computer (as this will cause the validation to stop working).
Once the software is validated on a particular computer, it does not need to be validated again, even if C-Breeze RIP is uninstalled and reinstalled. This means you can feel free to update your RIP whenever there is a revision without fear of losing your validation.
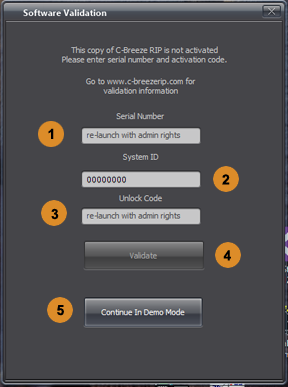
If you have purchased the software and need to validate, it has to be launched with administrator rights. This can be achieved by going to the program group (start/programs/c-breeze f20000/ and right-click on C-BreezeRIP F2000. Select "Run As Administrator". On Windows 10, after you right-click on the item, select "more" then "Run As Administrator".
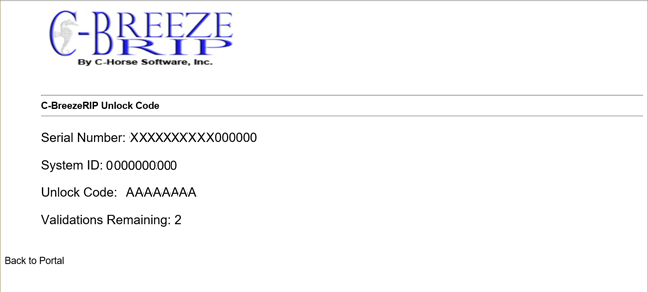
Once you've launched the software with administrator rights, the serial number (1) and Unlock Code (3) boxes will be enabled and the text "re-launch with admin rights" will not be there. Box #2 will contain your system ID. This is a unique number which is your computer's fingerprint. You will need this for validation.
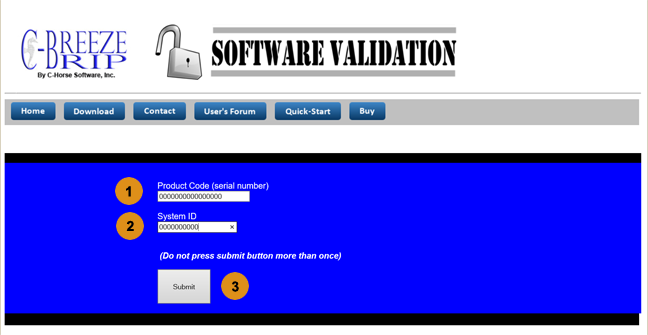
Write down or copy/paste the system ID and go to the validation section of this site: Click this link: Validation
Alternately, just click the "Validate Software" button on any page of this site.
-
Enter your serial number in the serial number box
-
Enter your system ID in the system ID box
-
Click the Submit button ONLY ONCE. The server will generate and display an unlock code. Enter the unlock code into the proper box of the C-Breeze Validation dialog (#3) and click Validate.
The server will generate and display an unlock code.
It will also display how many validations are left on your serial number.